
If my last post on meal planning seemed overwhelming, here are a few helps.
Feeling overwhelmed?:
Take one tip and use it, you don't have to do it all.
Slowly add in the other tips if you want
Just know - the getting started is more work than any of the planning. It will save you time in the end
Can't decide what to make?:
This Week For Dinner - weekly menus (both hers and in the comments)
Don't know what to do with your ingredients?:
Allrecipes.com - use their advanced search, you can type in ingredients you want or don't want. The ratings are a great help.
Help with couponing:
Pinching Your Pennies - a great link to organize ads and coupons for various areas
Savvy Shopper Deals - a great link to organize ads and coupons... but mostly in Utah County area; anyone can benefit from her video tutorials
Coupons.com - print online coupons
Boodle.com - print online coupons
Check the manufacturer's websites for coupons
What resources do you use? I would love to add them to this list!
October 28, 2009
October 26, 2009
S'more Pie
Yes, you read that right: Smore Pie! I am so excited about this idea.
I love camping and love that camping brings s'mores. But the problem with winter, it is too cold for camping and usually too cold for s'mores. This way you can have a fun, grown up version of s'mores all year round! The components: graham cracker crust, chocolate pie filling, and meringue topping.

1 1/4 cups white sugar
2 tablespoons all-purpose flour
2 tablespoons cornstarch
1/4 teaspoon salt
1 1/2 cups milk
4 egg yolks
1 ounce unsweetened chocolate
1 tablespoon butter
1 teaspoon vanilla extract
In medium saucepan, combine sugar, flour, cornstarch and salt. In a medium bowl, beat milk and egg yolks until smooth. Gradually stir into sugar mixture. Stir constantly over medium heat until mixture thickens and comes to a full boil. Boil and stir for one minute.
Remove from heat and stir in chocolate, butter and vanilla. Stir until melted.
Pour into pie shell. Place plastic wrap over filling to prevent skin from forming and chill for several hours.
My sister's tip: you know its the right thickness when your arm starts to be a little sore from stirring. ha.
1/8 tsp cream of tartar
1/8 tsp salt
½ c sugar
½ tsp vanilla extract
In a mixer beat egg whites until frothy. Add cream of tartar and salt and beat until stiff peaks form (when you pull the beater out the peaks stand up on their own and the tip doesn't curl over). Beat in sugar, 1 Tbsp at a time. Beat in vanilla.
Spoon onto cookie sheet lined with parchment paper. Bake in a 225 degree oven for 1½ hours.
Place on pie just before serving.
My tips: If not serving right away, store meringues in tupperware in dry place - they are very sensitive to humidity! Do not place on pie until just before serving. You can make a few large like me, or make smaller, and let every slice have its own dollop. You could even try one large meringue - that could be fun!

I love camping and love that camping brings s'mores. But the problem with winter, it is too cold for camping and usually too cold for s'mores. This way you can have a fun, grown up version of s'mores all year round! The components: graham cracker crust, chocolate pie filling, and meringue topping.

S'more Pie
Crust:
Pre-made come on, somtimes not everything needs to be made from scratch. But, if you are filling ambitious, go for it!Pie Filling:
Thanks to my sister for this!1 1/4 cups white sugar
2 tablespoons all-purpose flour
2 tablespoons cornstarch
1/4 teaspoon salt
1 1/2 cups milk
4 egg yolks
1 ounce unsweetened chocolate
1 tablespoon butter
1 teaspoon vanilla extract
In medium saucepan, combine sugar, flour, cornstarch and salt. In a medium bowl, beat milk and egg yolks until smooth. Gradually stir into sugar mixture. Stir constantly over medium heat until mixture thickens and comes to a full boil. Boil and stir for one minute.
Remove from heat and stir in chocolate, butter and vanilla. Stir until melted.
Pour into pie shell. Place plastic wrap over filling to prevent skin from forming and chill for several hours.
My sister's tip: you know its the right thickness when your arm starts to be a little sore from stirring. ha.
Meringue:
2 egg whites1/8 tsp cream of tartar
1/8 tsp salt
½ c sugar
½ tsp vanilla extract
In a mixer beat egg whites until frothy. Add cream of tartar and salt and beat until stiff peaks form (when you pull the beater out the peaks stand up on their own and the tip doesn't curl over). Beat in sugar, 1 Tbsp at a time. Beat in vanilla.
Spoon onto cookie sheet lined with parchment paper. Bake in a 225 degree oven for 1½ hours.
Place on pie just before serving.
My tips: If not serving right away, store meringues in tupperware in dry place - they are very sensitive to humidity! Do not place on pie until just before serving. You can make a few large like me, or make smaller, and let every slice have its own dollop. You could even try one large meringue - that could be fun!

Try using mini pie shells so everyone gets there own s'more pie!
October 23, 2009
Meal Planning
I love things to be organized - from my schedule to my underwear drawer. Recently, I have been working on my home organization; I divided up my chores similar to Martha Stewart's advice and I have organized my menu. Menu planning saves me time and money. Things don't always work out perfectly - life always throws us surprises - but I try to be ready for the "expected."
Here are some things that help me:

Required Tools: coupons, notepad, pens, pencils, binder, and 3x5 index cards. (I get these out every Saturday morning when I am making my schedule.)

1. Organize the week. This planner is located on my fridge. (Pink=Lou, Green=AC, Blue=me.) Because of my work schedule, my weeks are never the same. The blue strips are magnetic so I can move them around depending on the week. (AC and Lou are pretty much the same each day. They don't use theirs, but I schedule my life around them.) My menu depends on the week. (The nights I work I do easy, reheatable items. Some days are so busy, so we go out to dinner.)

2. Compare ads and/or coupons to see what is cheap. Yes, these are my crazy coupons clippings

3. Make a menu using the cheap items. Plan out breakfast, lunch, and dinner. I make meal cards using 3x5 index cards. One side is the meal, the other is the shopping list. On the shopping list, I write everything I would possibly need for that dish. You certainly don't need to type yours.
*These photo protectors are great. You can find them at Walmart. If you want, you could replace the day label with the snack if you want to plan even more.

When the week is over, I put my meal cards into a recipe box. I made tabs for all meals plus an "Other." This is where I have "Eat Out" or "Dinner at the In-Laws" etc.
4. Review your shopping lists. Make a list of what you don't have already in your house.
5. Be flexible when shopping. If your list says "broccoli" but asparagus is cheap, switch them out. Sometimes there is a great unadvertised sale.
6. Make menu adjustments based on what you bought. If you need to, you can switch out the menu cards.
A couple more items of note:
-I also store some recipes in the binder and place them behind the menu card. It is nice for those helpful spouses who want to help out with making dinner.
-After a month or so, you really won't be making many new cards. It becomes a lot easier!
I realize am a little OCD, but this system is so worth the effort!
October 21, 2009
Beef Vegetable Soup
I saw someone make beef soup and use butternut squash instead of potatoes. I thought it was a delicious, pretty, and fun alternative. This soup recipe is great to warm you up on those chilly fall evenings.

Beef Vegetable Soup
2-3 Tbsp olive oil
2 pounds stew beef, cut into 1½-inch cubes
½ tsp salt, plus more to taste
½ tsp freshly ground black pepper, plus more to taste
2 Tbsp all-purpose flour
1 onion, peeled and chopped
2 cloves garlic, chopped
1 Tbsp minced, fresh rosemary
1 Tbsp chopped fresh thyme
2 carrots
2 celery stalks
1 lb butternut squash, trimmed and cut into 2-inch cubes
¼ c chopped sun-dried tomatoes
5 to 6 c beef broth
2 c frozen peas
4 Tbsp fresh chopped flat-leaf parsley
In a large soup pot heat 1-2 tablespoons of olive oil over medium heat. Toss the beef cubes in salt and pepper and flour. Turn up the heat to med-high and add the beef to the pot. Cook until the beef is browned and golden around the edges, about 5 minutes. Do not overcrowd the pan, may need to do in batches. Remove from pan. Add more oil if needed. Add the onions, garlic, rosemary, thyme, carrots, and celery and saute until the onions are tender. Add 1 cup stock. Using a wooden spoon, gently stir up all the brown bits off the bottom of the pan. Add beef back to pot. Add the butternut squash and sun-dried tomatoes and stir to combine. Add enough beef broth to just cover the beef and squash. Bring the stew to a boil over high heat, then reduce the heat to low and simmer, covered, for 2 hours, or until meat is tender and falling apart. Season the stew with additional salt and pepper to taste. Add peas and cook until warmed. Sprinkle with the chopped parsley. Serve with crusty bread alongside.
October 19, 2009
I'm being featured!
Check it out! I am being featured over I Never Grew Up. I was so flattered.

Also, on Saturdays check out the Cooking Panel I am on. Here is last week's: Inspiration.


Pork with Sweet Balsamic Onion Sauce
I really wanted to make something all on my own, no changing found recipes or getting inspiration from other recipes - the only inspiration came from my brain.
This was the result. Delicious, savory, sweet. See how you like it.

1 red onion, sliced
1/4 c balsamic vinegar
1 Tbsp honey
1 Tbsp flour
about 2 c milk
1/4 c chopped parsley
Brown pork chops in skillet over medium heat. Remove from pan (its okay if they aren't cooked all the way). Add red onions and balsamic vinegar, scrape bottom of the pan with wooden spoon to get all that goodness in the sauce. Add honey and cook until onions are soft. Add flour and cook 1 -2 minutes, or until flour is absorbed is paste-like. (Make sure there are no large clumps of flour, this will make your sauce lumpy and will have an uncooked, flour taste.) Add milk slowly, stirring constantly until desired consistency. (Do a little more than you think because the flour will make it thicken slightly as it cooks.) Return pork chops to pan and cook until heated through. Add parsley, reserving some for garnish. Serve over buttered noodles (if you so desire, I highly recommend) and top with reserved parsley.

Try this sauce with chicken or beef! (And let me know what you think)
This was the result. Delicious, savory, sweet. See how you like it.

Pork with Sweet Balsamic Onion Sauce
1 thick pork loin chop, filted and pounded until 1/4 inch thick1 red onion, sliced
1/4 c balsamic vinegar
1 Tbsp honey
1 Tbsp flour
about 2 c milk
1/4 c chopped parsley
Brown pork chops in skillet over medium heat. Remove from pan (its okay if they aren't cooked all the way). Add red onions and balsamic vinegar, scrape bottom of the pan with wooden spoon to get all that goodness in the sauce. Add honey and cook until onions are soft. Add flour and cook 1 -2 minutes, or until flour is absorbed is paste-like. (Make sure there are no large clumps of flour, this will make your sauce lumpy and will have an uncooked, flour taste.) Add milk slowly, stirring constantly until desired consistency. (Do a little more than you think because the flour will make it thicken slightly as it cooks.) Return pork chops to pan and cook until heated through. Add parsley, reserving some for garnish. Serve over buttered noodles (if you so desire, I highly recommend) and top with reserved parsley.

Try this sauce with chicken or beef! (And let me know what you think)
October 15, 2009
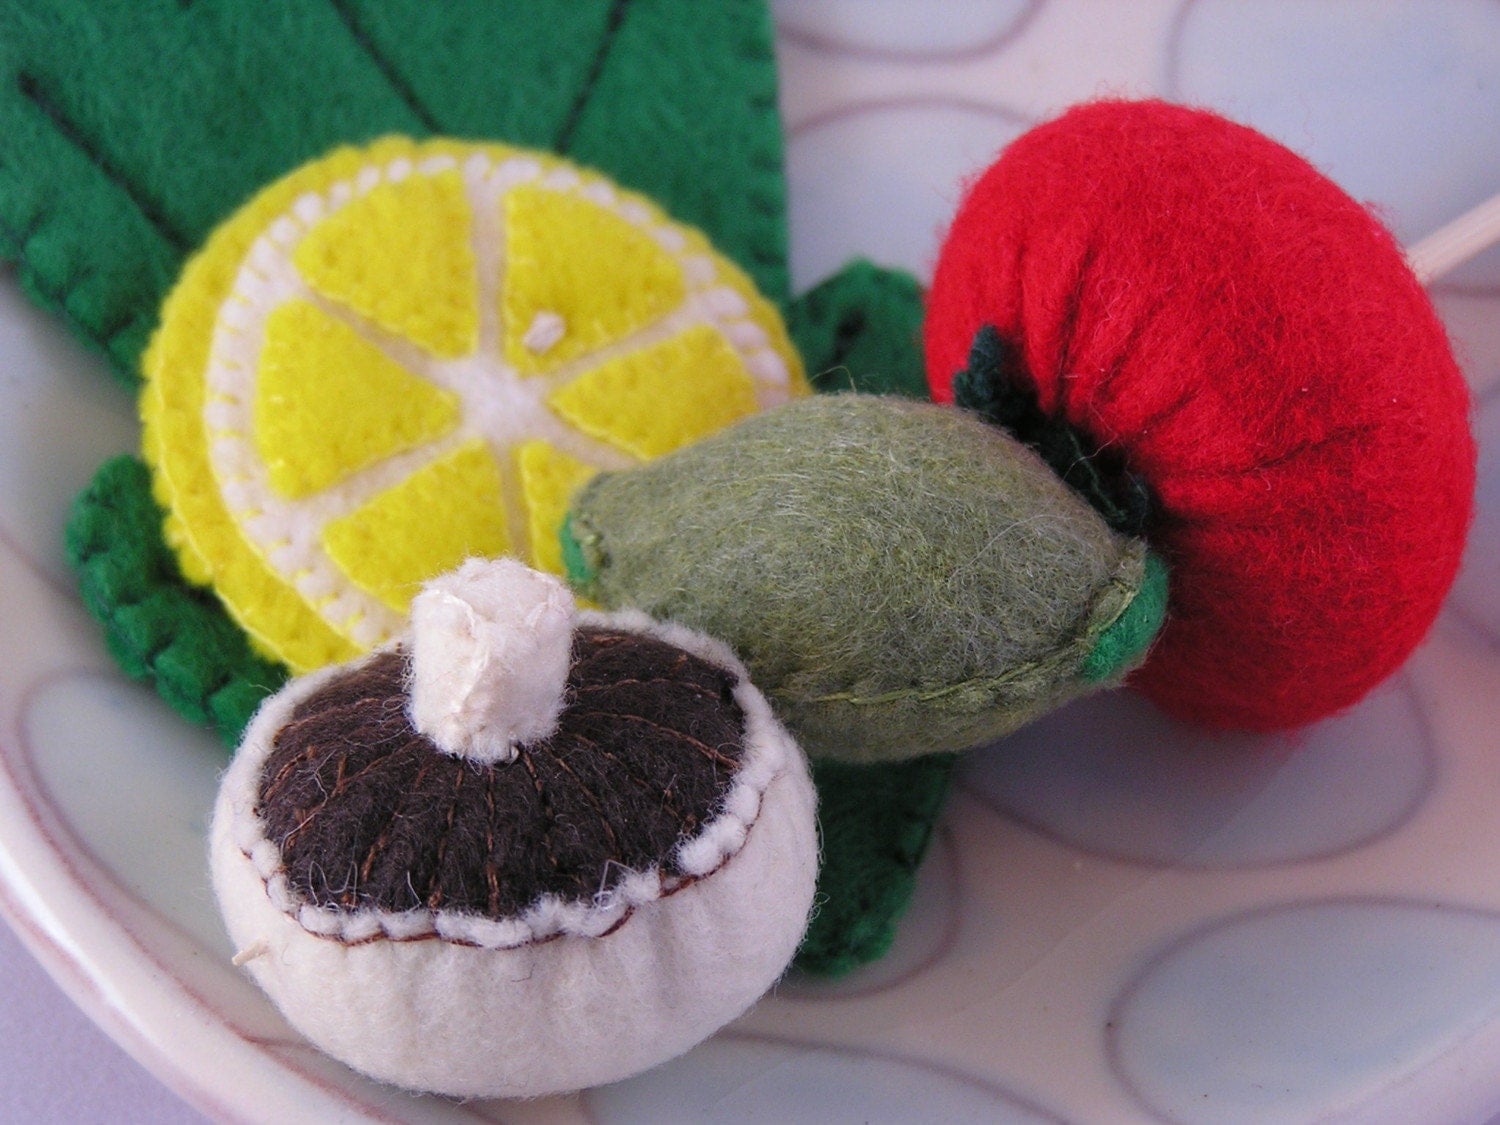
Felt Food
I know, I am probably a little late on the felt food craze, but I love them! I think they are perfect to get my baby excited for fabulous food. If she likes it in felt, she will like it in real life right?
Check out these amazing pieces!
(You can click on the link below the pictures to take you to where they are from?)


Check out these amazing pieces!
(You can click on the link below the pictures to take you to where they are from?)
October 12, 2009
Cinnamon Rolls
Twice a year, we listen to our church leaders at General Conference. Even if you aren't a member of the LDS church - you should read their messages, they are very inspiring. Growing up my mom always made cinnamon rolls. Now she has taught my sister and my brother - both who all make delicious rolls. My mom taught us well.
First, make this dough.
Once it has risen the first time, follow these tips:

1. Roll half the dough into a rectangle about 1/4 inch thick
2. Brush the dough with melted butter, leaving about 1 inch on one of the long side.
3. Sprinkle with cinnamon, I like a lot of cinnamon flavor, so I get my pretty dark. But do it to your taste.
4. Next spread a small layer of brown sugar. Sometimes I get carried away, and do too much. But that makes the rolls come apart. So hold back if possible. Now this is where you can add some raisens or nuts - my family likes them simple.
5. Now, roll it up, Jelly Style!
6. Pinch the seam together
7. Cut into 12 pieces. (Easiest to do half, half, then thirds)
8. If you like them to be soft all around, place close together in 9 x 13 dish, if you like them browned all around, place about 12 on a cookie sheet. Cover with dampened dish towel (if you live in a dry area), and set in warm area and let rise until doubled.
9. Bake at 375 degrees for 15-20 minutes, or until golden brown
10. Top with your favorite icing as soon as they are hot. (Do not use cream cheese frosting - too powerful, this is about the roll, not the frosting.)
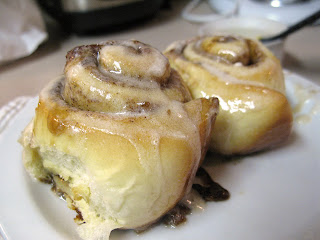
Quickly take a picture, even if it is slightly blurry because these are too good to worry about a retake!
First, make this dough.
Once it has risen the first time, follow these tips:

2. Brush the dough with melted butter, leaving about 1 inch on one of the long side.
3. Sprinkle with cinnamon, I like a lot of cinnamon flavor, so I get my pretty dark. But do it to your taste.
4. Next spread a small layer of brown sugar. Sometimes I get carried away, and do too much. But that makes the rolls come apart. So hold back if possible. Now this is where you can add some raisens or nuts - my family likes them simple.
5. Now, roll it up, Jelly Style!
6. Pinch the seam together
7. Cut into 12 pieces. (Easiest to do half, half, then thirds)
8. If you like them to be soft all around, place close together in 9 x 13 dish, if you like them browned all around, place about 12 on a cookie sheet. Cover with dampened dish towel (if you live in a dry area), and set in warm area and let rise until doubled.
9. Bake at 375 degrees for 15-20 minutes, or until golden brown
10. Top with your favorite icing as soon as they are hot. (Do not use cream cheese frosting - too powerful, this is about the roll, not the frosting.)

October 10, 2009
Being Featured
October 09, 2009
Pumpkin Cheesecake Bars
I can't wait for fall every year because I finally get to make these pumpkin cheesecake bars. It is perfect for dessert with some apple cider and a warm fire.

1 egg
2 Tbsp butter, melted
1-2 tsp pumpkin pie spice
In a large bowl combine until crumbly. Press onto bottom of jelly roll (11x15) pan.
8 oz cream cheese, softened,
14 oz can sweetened condensed milk
16 oz can pumpkin, or 2 cups cooked pumpkin, mashed
½ tsp salt
2 tsp pumpkin pie spice
1 tsp vanilla
In the same bowl as the crust was made in, beat cream cheese until fluffy. Beat in remaining ingredients. Mix well. Pour over crust. Bake at 350 degrees for 30-35 minutes. Cool and refrigerate before serving.
If desired, serve with Maple cream and a dollop of whipped cream.
*Tip: if you don't have pumpkin pie spice, combine 1 part nutmeg, 1 part ground ginger, and 2 parts cinnamon.

Pumpkin Cheesecake Bars
Crust:
16 oz pkg pound cake mix1 egg
2 Tbsp butter, melted
1-2 tsp pumpkin pie spice
In a large bowl combine until crumbly. Press onto bottom of jelly roll (11x15) pan.
Filling:
2 eggs8 oz cream cheese, softened,
14 oz can sweetened condensed milk
16 oz can pumpkin, or 2 cups cooked pumpkin, mashed
½ tsp salt
2 tsp pumpkin pie spice
1 tsp vanilla
In the same bowl as the crust was made in, beat cream cheese until fluffy. Beat in remaining ingredients. Mix well. Pour over crust. Bake at 350 degrees for 30-35 minutes. Cool and refrigerate before serving.
If desired, serve with Maple cream and a dollop of whipped cream.
*Tip: if you don't have pumpkin pie spice, combine 1 part nutmeg, 1 part ground ginger, and 2 parts cinnamon.
Maple Cream:
Combine 1 cup heavy whipping cream and ½ cup real maple syrup in a small saucepan. Simmer for 30-40 minutes or until reduced by half.
October 06, 2009
New Sweater

AC (my husband)'s sister, Meg, married Bob. Bob's parents live in Scotland and I have never met them (though I want to). Bob's mother knit this cute sweater for Lou when she was born! I am so excited it fits now. Isn't it the cutest thing you have ever seen?! She is so nice - I only told to family tree to show you how distantly related she is - she is so nice to make this for us.
October 05, 2009
What's in Season - October
What's in Season in October?
 Pumpkins!
 Pumpkins!
Get excited for a few pumpkin recipes this month! I love it in savory and sweet dishes. Got any good pumpkin recipes too?
Although the farmers markets are closing, it is nice to know what is in season now to know what produce is the freshest and cheapest.
Although the farmers markets are closing, it is nice to know what is in season now to know what produce is the freshest and cheapest.
Produce in season now:
Beets
Brussel Sprouts
Eggplant
Cauliflower
Endive
Escarole
Fennel
Potatoes
Spinach
Winter Squash
Sweet Potatoes
Turnips
Apples
Raspberries
Cranberries
Figs
Pomegrantes
Beets
Brussel Sprouts
Eggplant
Cauliflower
Endive
Escarole
Fennel
Potatoes
Spinach
Winter Squash
Sweet Potatoes
Turnips
Apples
Raspberries
Cranberries
Figs
Pomegrantes
October 01, 2009
Chicken Posole
When my husband saw me looking at a Chicken Posole recipe he told me I had to make it. He ate it a lot when he was living in LA and visiting a lot of Hispanic people. This was a common soup served to him. After trying this recipe he said it was very authentic.
 Chicken Posole
recipe adapted from Real Simple Magazine
1 Tbsp olive oil
1 onion, thinly sliced
salt and pepper
32 oz chicken broth
28 oz can diced tomatoes, drained
1 dried ancho chili, thinly sliced
2 cups shredded rotisserie chicken meat
15 oz can hominy, rinsed
1 lime, cut into wedges
heat the oil in a large sauepan over medium heat. Add the onion and 1/4 tsp each salt and pepper, stirring occasionally until onions are soft and starting to brown. Add broth, tomatoes, and chili. Bring to boil. Stir in chicken and hominy and simmer until heated through. Serve with a lime wedge.

Tips:
 Those dried ancho chilies are pretty hard to cut with a knife - cut with kitchen shears.
The original recipe says you can substitute 1/4 tsp red pepper flakes, but avoid if you can - the ancho gives the authentic taste.
 When shredding your chicken, save the skin, bones, and all other "leftovers" to make broth or another soup.
I use the lid of the rotisserie chicken to hold the chicken until I am ready to use it - save me a dish from washing.
Subscribe to:
Posts (Atom)


